Showing posts with label gift. Show all posts

Monday, November 5, 2012

it takes a village

Love and support reveal themselves in so many different ways: a visit from a friend to peek at the babies, an offer to take big sister for a play date, delicious and nourishing dinners (oh we are so grateful!) and perhaps my favorite - homemade gifts! So much time, so much thoughtfulness, so much love! I oooh and aaah over the needlework, the combination of fabrics, the intricate crochet and knit designs, the adorable wee-ness of it all. How did we accumulate such good (talented!) people around us? 


I whisper a million thank yous to our village.

Monday, January 23, 2012

Cousin Love - Happy Birthday O!

Happy Birthday to MamaM's little girl, Olive. Two years old today! My, how the time flies. Mayumi wanted to make something special for her little cousin. Knowing that she loves all things that go, particularly airplanes, we created a little topsy-turvy doll. I made one for Maya earlier in the year and she loves it. Now, Olive will have her own, too.
Olive in her aviator suit on the left, Maya's doll on the right.

When you flip them upside down, their skirt goes inside out and reveals another doll! 
Cute no? I followed the pattern from Hilary Lang's Wee Wonderfuls: 24 Dolls to Sew and Love.

Hopefully Olive gets lots of good, cuddly use out of it. Happy Birthday O!

Saturday, December 18, 2010

Homemade: Kid's Belt


This is a fun and super easy little project that makes a great stocking stuffer.  I got the idea when Mayumi was about 12 months old - you know how proud I am that she was out of diapers at an early age (I'm sorry if the bragging is annoying, but EC is wonderful!).  One negative aspect was that her diaperless little bottom wouldn't support her pants - they were always slipping down her hips.  My remedy was to make her a cute little D-ring belt using some leftover ribbon. 


This year she'll find a new belt in her stocking!

Here are the supplies you'll need:
~1 yard of cotton webbing (mine was 28 inches long, 1 inch wide)
~1.5 yards of ribbon of your choice (mine was 32 inches long, 1 inch wide)
Thread that matches your ribbon and/or webbing
Set of d-rings

1. Pin the ribbon to the webbing and stitch around the short edge with a zigzag stitch to prevent fraying.


2. Insert sewn edge through two D rings and fold over to wrong side.  Sew using edge stitch.


3. Fold over the extra ribbon over the webbing and sew both sides along the edge using a zigzag stitch (oh, to have a serger!)


4. Voila!  You have a darling little belt to keep those little pants up!

Thursday, December 16, 2010

Oishii: Granola

I am a big fan of making my own granola. It is such a forgiving recipe with almost endless variations, but it's taken a few tries to come up with one that works for me and my family.  The one below is the one we love the most and I thought it might make a nice gift this Christmas.  A few glass jars from IKEA with some ribbon make it look nice 'n pretty.


Crunchy Granola
Ingredients
2 cups rolled oats
1/2 cup flaked coconut
1/2 cup sliced almonds
1/2 cup sunflower seeds
1/4 cup sesame seed
1/2 cup honey
1/3 cup coconut oil (melted)

Directions
Combine oats, nuts, coconut and seeds in one bowl.  In a separate container, mix honey and coconut oil, then pour over oat mixture and stir to combine.  Spread evenly onto a cookie sheet and bake in 300 degree oven until lightly browned, stirring occasionally.  Remove from oven and spread onto waxed paper to cool.  Store in airtight containers for up to 2 weeks.

Thursday, December 9, 2010

Furoshiki Giveaway Winners!

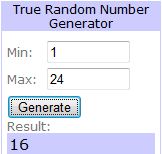
Thanks to everyone who entered the furoshiki giveaway.  Our two winners, chosen by random, are:


 We'll send your prizes in the mail as soon as we get your postal address.

In the meantime, so many of you expressed interest in the art of furoshiki and we want to encourage you to try it out!  You don't need anything fancy - you can make your own furoshiki using fat quarters or other leftover fabric or you can purchase lovely handkerchiefs or scarves from the thirftstore.  Here are a few more folding ideas - or experiment and create your own!  And if you get the chance, email us your lovely furoshiki creations so we can see your handywork.  Thanks!

Wednesday, December 8, 2010

Homemade: Ruffle Socks


 Even if you're not that crafty, this is an easy project... you just need a needle, some thread, a pair of socks and a length of cute ribbon.  Like my knitting, I try to find small moments to do this handsewing: sitting at church, watching a movie, chatting with friends, sitting with Mayumi as she colors, etc.  A nice little stocking stuffer, don't you think?


Wednesday, December 1, 2010

Giveaway: Furoshiki

Our December Giveaway is a set of furoshiki.

Wait, you don't know about furoshiki?  That's okay, but once you know, we expect you to help spread the word!  Furoshiki is the Japanese art of wrapping gifts with cloth.  It is beautiful, super eco-friendly and a perfect answer to all your holiday wrapping needs.


Below are several ways to fold a furoshiki around an object (courtesy of infomapJAPAN).  For more folding ideas, check out this site.


For our giveaway this month we are giving away two sets of furoshiki folding cloths.  To enter, simply leave a comment by 8pm EST on December 8th.  We'll select two winners and send your goods to you ASAP so you can be prepared for the holidays!

Monday, November 8, 2010

Preparing for Christmas


I came across this idea on Plain and Joyful Living blog to pledge to a handmade holiday this year.  In her own words:
To create with our hands using mostly sustainable materials... and when that is not possible, to purchase from small family businesses ~ Giving with love while caring for the earth.
This idea has always been a cornerstone of our holidays.  Growing up, my mother was pretty dedicated to making most of the gifts she gave.  November would find us huddled around a quilt frame, tying quilts even as young children.  She would fill mason jars with fruit she dried in her dehydrator, bake a myriad of pies, and make all manner of Christmas crafts and treats.  Those were the gifts she gave.  There was a time I was super-embarassed about it - when my friends were getting (and giving) designer clothes and high-tech gadgets - but at some point I realized that her gestures of love were far more meaningful (to both giver and receiver) than most store-bought items. 

In my life I've tried to follow suit.  My first Christmas gift to my husband (back when we were highschool sweethearts) was a homemade photo frame with pictures of us.  We still have it!  Last year we made homemade jam and bread to give to most of our friends and neighbors (a successful endeavor that we will probably repeat this year).


Granted, it takes a little more work and thought and preparation, but it is a labor of love, and when you do it together as a family, it becomes a bonding experience as well.  As the weather gets colder and December looms on the horizon, I'm starting to realize it is time to get started!  So, as I complete projects, I'll be posting them here and please, do the same -  I always need inspiration!

Thursday, May 6, 2010

Homemade: Mommy Tote

It's so hard to find the perfect gift for mothers - something creative and beautiful and useful that captures your intense gratitude for the amazing sacrifice and dedication they've shown.  It's almost impossible!

But this little project may be something... 

Inspired by one of my favorite ee cummings poems (you may have seen it posted here a few weeks ago) I thought making a handy little tote with the words "i carry you in my heart" on it would capture somewhat the feelings of a mother for her children (or grandchildren).  I used about half a yard of fabric for the outside and found a complementary color for the pocket, lining and handles.  I plan to send it along to my mother tomorrow (look for it in the mail soon, mom!).


For the picture frame I simply traced a lopsided heart out of cardboard, covered it with fabric and glued on a piece of vinyl behind it to protect the photo.  Using embraidery floss, I just sewed it on to the pocket.  It was quite an easy little project - and I think it'll be handy for carrying a couple magazines or books (it's a bit more delicate rather than sturdy, so nothing too heavy!).

I know some of you have some wonderful, thoughtful, and creative gifts you've given and/or received for Mother's Day.  Please share!

Wednesday, February 10, 2010

Homemade: Valentine's Candy Jars

Ooh, I L-O-V-E this project because it is so ridiculously easy and so ridiculously cute! With a few simple steps and a little creativity, you can turn your old glass baby food jars into cute treat jars. I made mine for Valentine's Day, but was inspired by the uber-talented Ashley at Make It and Love It, who made her jars for autumn. These would also work well as favors for showers or birthday parties, stocking stuffers or any number of holidays.

The best part was that since the jars are so small, I was able to decorate them using only leftover scraps of paper and embellishments, so it's a totally recycled project!

The line-up:


More details:
This jar was made with some leftover pink rice paper. I cut out the flower branch from a piece of old scrapbook paper and glued it all on the jar with Mod Podge. Filled with cinnamon candy hearts.


View from the top:


For the spunky love in your life. Ingredients: leftover paper and ribbon. Oh, and conversation hearts and Nerds.


Floral vellum-themed jars. These were made with a $1 package of die-cut flowers, leftover stickers and twine. Easy!

Tuesday, January 19, 2010

Anticipation

By MamaQ

The next best thing to birthing a new baby is when your SISTER births a new baby!  MamaM is due today and we're all just waiting to get the phone call.  I have my plane tickets bought and am enjoying the delicious anticipation of meeting my new niece.  Getting to see my sisters, my mom (flying in from Japan), and MamaD's little one, Lucy, is added bonus.

As always, there is a scramble to pack and a few last-minute projects in the works; an auntie must always arrive bearing gifts!
books!
trying to finish these dolls and their clothes.  faces would be nice, too.  and hair.
sweet stroller blanket with matching hat!
otedama (Japanese beanbags)

So excited to see these girls!